
Turn ordinary plastic bottles into a beautiful colorful hanging decoration with flowers, beads, crystals, and warm outdoor lighting. This easy upcycling project is perfect for patios, gardens, balconies, and cozy home decor.
If you love colorful DIY projects and creative ways to reuse everyday materials, this DIY plastic bottle flower chandelier is a project worth trying. With a few simple supplies, you can transform clear plastic bottles into beautiful hanging decorations that sparkle beautifully in natural light.
The combination of colorful flowers, crystal beads, pearls, and warm decorative lights creates a cheerful look that works especially well in gardens, patios, balconies, and outdoor entertaining spaces.
Why You’ll Love This DIY Project
This project is more than just a decorative craft. It is a simple way to give plastic bottles a second life while creating something completely unique for your home.
Here are a few reasons to try it:
- Great way to reuse empty plastic bottles
- Easy to customize with your favorite colors
- Crystal beads create beautiful reflections
- Can be decorated with LED fairy lights
- Perfect for gardens, patios, and balconies
- A fun weekend craft project
- Budget-friendly home decoration
Materials You’ll Need
To create your own colorful hanging bottle chandelier, gather the following materials:
- Clear plastic bottles
- Colorful artificial flowers
- Green artificial leaves
- Pearl beads
- Crystal or acrylic beads
- Decorative chains or jewelry wire
- Jute rope or natural twine
- Hot glue gun and glue sticks
- Craft scissors
- Craft knife
- Small decorative bells or flower charms
- Battery-operated LED fairy lights
- Decorative ribbon or colored craft material
- Small metal ring or hoop for hanging
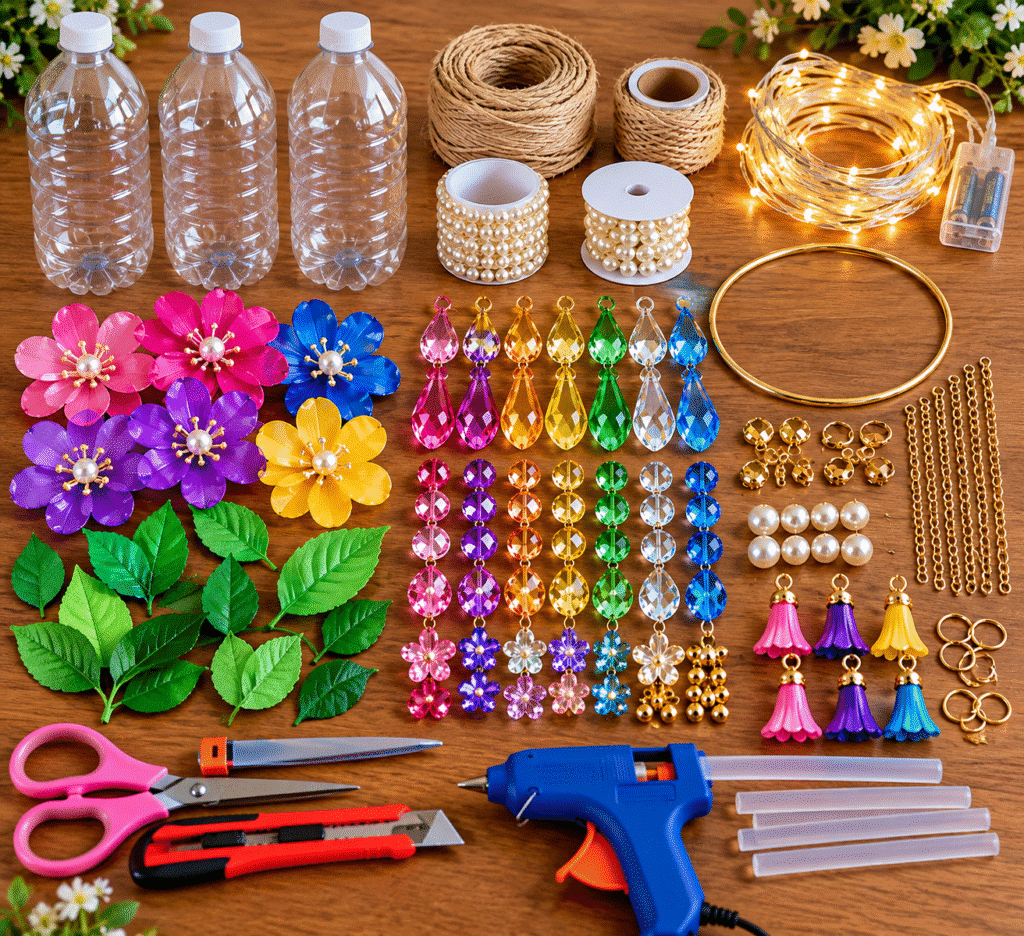
Tip: Choose clear bottles with similar shapes and sizes for a more polished final result.
How to Make a DIY Plastic Bottle Flower Chandelier
1. Clean the Plastic Bottles
Start by thoroughly washing and drying your plastic bottles. Remove all labels and adhesive residue so the finished pieces look clean and professional.
Make sure the bottles are completely dry before beginning the craft.
2. Cut and Shape the Bottles
Carefully cut the bottom portion of each bottle using a craft knife.
Next, make evenly spaced vertical cuts around the bottle. Gently bend or shape the strips outward to create a decorative flower-like or lantern-like form.
Take your time during this step to keep the cuts as even as possible.
Safety tip: An adult should handle the craft knife and hot glue gun.
3. Decorate the Bottle
Now comes the fun part.
Wrap the neck of the bottle with natural jute rope and secure it with hot glue. Add a row of pearl beads around the top for a more elegant appearance.
You can also add decorative trim around the bottom of the bottle.
4. Add Flowers and Leaves
Arrange colorful flowers around the bottle.
For a cheerful spring-inspired look, combine shades such as:
- Pink
- Purple
- Blue
- Yellow
- Coral
Add small green leaves between the flowers to create a natural floral pattern.
Use hot glue to secure each piece firmly.
5. Add Crystal Beads
Cut several pieces of jewelry wire or thin decorative chain in different lengths.
Attach colorful beads, pearls, and crystal pendants to each strand.
For the most attractive result, use different lengths so the decorations hang at different levels.
The faceted crystals will catch the light and create beautiful reflections throughout the space.
6. Create the Hanging Details
Attach several decorated bead strands around the bottom of the bottle.
You can finish each strand with:
- Crystal drops
- Small flowers
- Pearl beads
- Decorative bells
- Flower-shaped charms
Mix different colors and lengths to create movement and visual interest.
7. Add Warm LED Lights
For a glowing evening effect, place a small battery-powered LED fairy-light string inside the bottle.
Warm white lights work especially well because they complement the colorful flowers and crystal decorations without overpowering them.
Avoid using candles or open flames inside the plastic decoration.
8. Create the Hanging Loop
Secure a strong piece of jute rope or decorative cord around the top of the bottle.
Attach the other end to a metal ring or suitable hanging hook.
Before hanging the decoration, gently test that everything is secure.
How to Style Your Finished Decoration
One of the best things about this project is how versatile it is.
Garden Decor
Hang several colorful lanterns from a pergola, tree branch, or covered outdoor area. Combine different colors to create a playful garden display.
Balcony Decor
If you have a small balcony, hang one or two pieces near a seating area to add color without taking up floor space.
Patio Decorating
Create a group of three or more lanterns at different heights above an outdoor dining table or lounge area.
Indoor Home Decor
You can also use the decoration indoors near a bright window, sunroom, craft room, or reading corner.
Tips for a More Beautiful Finish
Use a consistent color palette.
Although many colors look beautiful together, choosing three to five main colors can make the finished decoration look more coordinated.
Mix textures.
Combine glossy plastic, soft flowers, pearls, jute rope, and faceted crystals for a richer appearance.
Vary the hanging lengths.
Different strand lengths make the decoration look fuller and more dynamic.
Use warm lighting.
Warm LED lights create a cozy glow and make the crystals sparkle beautifully in the evening.
Don’t overcrowd the design.
Leave a little clear space between flowers and hanging strands so each decorative element remains visible.
A Creative Way to Upcycle Plastic Bottles
DIY projects like this are a wonderful way to turn everyday household items into attractive home decorations. Instead of throwing away clear plastic bottles, you can transform them into something colorful, decorative, and useful.
The best part is that there is no single correct design. You can change the flowers, colors, beads, crystals, and lighting to match your own decorating style.
For a soft romantic look, try pink, white, and lavender.
For a vibrant summer look, combine turquoise, yellow, coral, and pink.
For a more elegant design, use clear crystals, white flowers, pearls, and gold accents.
Final Thoughts
This DIY plastic bottle flower chandelier is an easy and creative project for anyone who enjoys colorful crafts and unique home decorating ideas. With recycled bottles, artificial flowers, pearls, crystal beads, and warm LED lights, you can create a beautiful decoration without spending a lot of money.
Whether you hang it in your garden, balcony, patio, or indoor living space, this colorful handmade decoration can instantly add a cheerful and magical touch.
Save this idea to Pinterest and try making your own colorful bottle chandelier this weekend!